Tuesday 11 September 2018

Circle of Life and Getting back into it


*Drops down from ~30 meters with a smile* HELLO THERE!


So it's been a while. To be completely honest, two years and almost 4 months. Where have I been?

In one word? Surviving.


Saturday 14 May 2016

Circle of Paint: Basing Tutorial: Cobblestone (aka ye-olde streets)

Heyo!

I'm back, and I'm here for the basing tutorial I promised. It's not a long post, the new commissioned miniatures are already being worked on, so let's get right to it, shall we?

If you ever decide to paint some miniatures with bases already molded on, one of the best and easiest ways to make those bases look better is to make a "ye-olde" street under their feet. It doesn't involve much skill or time, and only uses three colo(u)rs. Here's how:

Step one: paint your bases black.


Black just like my soul

 Step two: paint simple gray outlines of stones on the now black bases, like so:


It doesn't matter if the lines are not even, you will paint over this anyway!

Step three: fill in the space between the lines, even out the paint just a little and make it look like there are gray puddles under their feet.


Remember: stones are not even, so your paint doesn't have to be THAT even.

Step four: take a lighter shade of gray and drybrush it over the middle of the gray puddles that you made:


Repeat step four until you have your desired effect.

And that's that! Easy, quick and looks good. Also, good for beginners, since their hands tremble like jackhammers. Don't believe me? Here, some proof:


Mrs. Legend painting a miniature for the first time.

That's all for now, folks! Stay tuned for updates on the new commissions!

Till then,
Banshee Legend
The Painter

TFCTBY!

Wednesday 4 May 2016

Commission 4: Episode 4: the Cone of Shame (Wish I was Invisible) Woman steps up... And down

Ohai!

Been a while, eh? Yeah, I know. I'm a baaaaad blogger. I spent a few days learning how to use a damn airbrush. but more on that some later time. We are here with business, so let's get to it.

After a few failed airbrushing attempts (still shit at it, but might get better soon) I decided it was time to come back to the brush and finish the Commission 4 (aka the Paintastic 4 after ms. Cone of Shame).

As it has now become customary, it's time to see the amazing, ultra high definition, super detailed reference pictures I was sent for Ms. Ariad (that's her actual name) Cone of Shame I wish I was Invisible woman.

.

.

.

.

.

.

Ready?

.

.

.

.

.

.


Fuck me sideways

 COOL! Right?

The first thing I liked about Ariad (her Commission 4 code name is WAY too long), was that she wasn't all grey and black. That was nice. what I didn't like though... See that cone of shame? see that spider web pattern on it? FUCK. THAT. SHIT. Seriously. You don't have the SLIGHTEST idea on how hard it is to do them right. Also, to get them all, like, every single one, I would have had to cut off her head, arms and that metal wingy bit on the back. Nuh-uh. Not again. No.

Now look at the reference pic again. Just for a moment. Something looking wrong? Something questionable? Here, I'll help you out:

That some Vasarys Targaryen shit right there bruh

 I mean... She seems like this weird spider mummy queen of sorts, right? then WHY THE HELL IS HER HEAD GOLD? Still don't know, and after I finished painting her, to be honest, I don't really care. I've found that it's not healthy to care about backstory a lot, especially when you are provided none. Anywho, let's get to business. No, really this time.

Since I'm a bit special lately, I only took the first pictures of Ariad after the first coat of paint was applied. The colo(u)r Administratum Grey was used for her mummy parts:

Hey, you can see the difference in this picture!

Not in this one though

After that I looked at the small cardface picture I was provided. And I saw purple. Do you see purple in that picture? Go on, scroll up and check it out again, I'll wait.

Yup, that's purple!

Oh yeah, added the gold bits too. Again, forgot to take in between pictures, I'm SPESHUL

I don't like painting metallics all that much. They are a bitch to dilute properly, too thick when not diluted and they make my brushes almost unusable for at least 10-15 minutes. Also, it's nearly impossible to paint small details using those metallic paints.

See those details on her chest? Did it in only 5 tries!

See that collar? The one with golden spider web pattern? FUCK THAT COLLAR.
So yeah, that's pretty much it for Ariad, the Cone of Shame (Wish I was Invisible) Woman. All I needed to do was some minute clean up and apply some wash, to give that robe of hers some depth.

All in all a pretty nice miniature, but the worst mold up to date. It was horrendous. It was a pain. But I pulled through and finished it, right? Right. Now, for the moment you've all been waiting for. I present to you, THE COMMISSION 4!


That is it. They're done. Next step - basing, which, according to Mr. Commissioner Extraordinaire have to be hand painted rocks (like a cobblestone street or some shit like that). Basing tutorial? BASING TUTORIAL!!!!


Till then,
Banshee Legend
The Painter


TFCTBY!


Saturday 23 April 2016

Commission 4: Episode 3: Mr Bendy Staff becomes an amputee, and why I hate painting Fantasy Flight miniatures

Ohai!

It's that time of the week again, and today I got around to painting another one of the Commissioned 4. It was time to paint Mr Bendy Staff (heheh). Now, before we start, it's become a custom for me to show you guys the reference picture I was given. Wanna guess?

.

.

.

.

.

.

Well?

.

.

.

.

.


Yup

Derpity!

With a couple of reverse google searches I found a bigger picture and found out his name. Rylan Olliven.

Now, before I start going through the painting process (face painting tips coming!), I would like to vent. Or rant. Whatever.

The game these miniatures belong to, Descent: Journeys in the Dark 2nd Edition is made by Fantasy Flight Games (which we will call FFG from now on so your little blog reading eyes don't get too tired of long names). For those of you who don't know, FFG make a lot of quality board games. Many of them include miniatures, and those miniatures are amazing. Truly. But they are not made to be painted. and I'm not talking about all the excess plastic I need to cut and file before I take to the brush. The poses are crooked. The molds are somewhat silly (like the gap between the front and the back of a robe being filled with plastic) and a little retarded to say the least. The plastic is soft, bendy and (something I learned from the interwebz, thank god) start melting and deforming if a hardware store primer is applied. In short, it's a god damn nightmare to paint them. Parts that are supposed to be different colo(u)rs touch each other, and that wouldn't be an issue if the plastic wasn't that bendy. Why, you ask? Because every time you bend a plastic part to paint around it, it either deforms or breaks. Or both.

This was the deal with Rylan here. His staff was in a position that required me to bend it around (hence the name) and I almost broke it twice while cleaning the excess plastic and molding lines.


You can see the staff bent in this picture

That means I would have to amputate Rylan's right hand, paint everything, and slap that hand back on him. So that's what I did. Snip Snip!

I'm just glad it was his hand-staff that needed cutting


Okay boiz and girlz! Time to get to painting. If you ever decide to paint a miniature with a face and don't have a lot of experience with it, do this: Paint the whites of the eyes first, then the iriseseseses, then paint the face over. Like this:


Hair, beard and staff painted


With that done, it was time to paint the cape. I even bought a new colo(u)r blue for it! After the first layer of paint it looked a bit fluorescent, which gave me a bit of a shock.

Oh yeah, painted the shoes brown too

Sure glad the second layer fixed that.

As people say, when in doubt, add another layer (they don't say that)! After that was done, his garments were in dire need of some paint! Colo(u)r grey (Administartum Grey from Games Workshop) seemed to do the trick.

Also added eyebrows. No man is complete without eyebrows.

Then it was time to stick the poor guy's arm back. And, of course, wash! This time I used two of them. My beloved brown for his garments and a purple for the blue cape (again, purple is still better than black, since it doesn't have that glossy oily finish). After the washes were dry, I painted some highlights on the back of the cape to make it look three dimensional.

To add to that, my lovely lady helped me decide on a highlight colo(u)r for the cape.


It seemed I was almost done with this, but Raylan still needed some brushing up. I took out my shiny metallic colo(u)rs and painted some details for his garment and staff. Some drybrushing with a lighter shade of brown was done on his boots and gloves as well.


Now that Raylan looked like a man of stature, it was time to finish up with his staff. Since the reference picture showed it as if it was made of stone, a colo(u)r dawnstone was used on the Ram Head and washed over with some brown wash. And here is the final outcome:

Mr. Raylan Bendy Staff

Well, after all this ranting and painting, it's time for me to go to rest. Raylan is now in colo(u)r, my back is hurting and I really need a smoke.

Till next time,
Banshee Legend
The painter

TFCTBY!


Sunday 17 April 2016

Commission 4: Episode 2: The Human I Torched My Extremities lights up. Also, Medieval Thingamajig gets an update

Ohai!

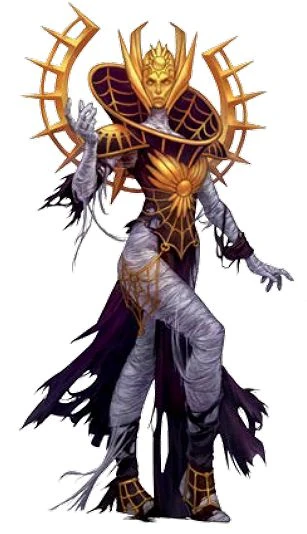
So it was time to paint another person from the Commission 4. And since I found out some backstory about it, I chose to paint the Human I Torched My Extremities, as he is the brother of my first painted mini, the Medieval Thingamajig (fans of the Thingamajig, there's a little surprise for you at the bottom!).

DISCLAIMER: This post is image-heavy.

I started out with him the same way any other mini - choosing colo(u)rs. The reference pictures sent to me were, again, a card face and an already painted miniature in a whopping "xl" size. I'll let you guess the colors of the miniature, besides the fact the dude's head and arms are on fire, which include red, orange and yellow.

.

.

.

.

.

Well?

.

.

.

.

.
NO, he's mostly gray and black.

Card face. BRUTAL-ER!

Again, original size picture

Since I like painting with colo(u)rs that range a bit farther than the beloved book of many single moms around the world, I looked at card face picture, squinted and saw purple. You know what I said to myself?

TIME TO DO THIS!

Again, I start out with the base colo(u)rs - the ones that will dominate on the miniature.


Red and purple, yay!

Moving on, I wash the whole robe with a black wash (remember what I wrote in the last post? DO NOT USE BLACK WASHES. well I didn't listen to myself and had a lot of cleaning up to do afterwards) and add colo(u)r in the chest piece and the scarves (I guess).

Yes, the colo(u)r is different from the stock miniature.

I mean, look at his head. See the difference? Me neither.

And then... The flaming extremities! I have to confess, I haven't painted anything even remotely similar to a fire before. So I took a few colo(u)rs that you can see when looking at flames and went for it (I hope some of you are thinking ooooh, he's a true professional...). So again, step by step:

Red!

Orange!

YELLOW! P.S. It's starting to sound like a Power Rangers episode...

After the colo(u)r yellow and when the flames were looking decent I applied another layer of brown wash, which made the flames look 3d. I also added the wash on the chest piece and the scarves.

I looked at the card face picture again. He had a ton of tiny gold details on his chest piece and on the lower (red) part of his robe. This meant I had to smear my nose print on my lamp's magnifying glass. Maybe one day I'll add a picture of me doing that, but before that time comes, this is the finished gold detailing:

Note the detailing on the bottom (red) part of the robe. DISCLAIMER: these are not my fingers. P.S. someone compliment my lady's miniature holding skills and manicure pls.

Beautiful, isn't it? This seemed like the finishing touch the Human I Torched My Extremities needed. So I cleaned up the glossy robe a bit and sent my work to the order-placer-man.

He said cool.

Okay, cool. Here's the finished (base-less, since I am planning on doing a basing step by step) miniature:

Cue Darth Vader's (™ & © Disney, I guess) NOOOOOOO from episode 3

Still looks like a chick to me... -A friend

This was pretty quick, only took about an hour from start to finish. Now onto the Medieval Thingamajig. I had some tiny shields left over from my earlier miniatures (Games Workshop is good for one thing - they add a lot of option parts that can be re-used for a greater good):

Tiny shields

I sent the order-placer-man this picture, saying that Mr. Medieval Thingamajig still looked unfinished and if it was cool to add a shield to his empty hand. Not only did he say cool, he also sent me a picture of a god damn card in the game, that gives the guy a god damn shield:

Gotta love board games, eh?

He insisted that I make the eyes of the skull red. Now there's a thing you have to understand... the shield is 4x3 god damn MILLIMETERS in size. IT'S GOD DAMN TINY. The whole miniature measures a tad over 22mm. So I took some super glue (the plastic cement does not work after you have already painted the miniature) and stuck that thing on his extended arm. I must admit it seems more like a buckler than a shield, but it does give Medieval Thingamajig the completion he deserves. The question still stands though - can I make the eyes of the skull red?

CAN I MAKE THEM RED?

What do you think?


Fuck YES, I can.

The shield painting was pretty straight forward - Evil Sunz Scarlet (in other words, plain bright red) spots where the eyes are, Ironbreaker base (also known as gunmetal, same one I used for his armor), Brown wash (Agrax Earthshade) and some Mithrill Silver (plain silver in non-Games Workshopian) for the edges, visible bolts and to make the skull ornament literally pop out.


Brutal? Yes. Red less-than-a-millimeter-wide eyes on the shield kind of BRUTAL!

That is all for today.

For episode three I have prepared Mr. Bendy Staff (heheh).

Till then,
Banshee Legend,
The Painter

TFCTBY!

Commission Rant, aka NO FREE SHIT, EVEN ON THE INTERNET.

So I'm at work minding my own business. I open up a local miniature wargaming club's page to see if I received any private messages. I did. One random message from a user registered today. Red flag.

He's asking me to do some commission painting, 30 miniatures, tabletop quality at least. I calculate it to be at least 210 EUR. My monthly pay is 245-ish. Big fat GREEN FLAG.

He tells me he's from Lithuania, just like I am. Green flag.

The miniatures are to be painted in 3 days. Yellow flag.

I tell him it would cost extra. No reply.

The triange of Truth


A few minutes later I get a new thread of  Private Message saying he would take these miniatures to a store in the United Kingdom, where they would be set up on a display, visible to everyone.

I say it's cool, but he hasn't aggreed on a price, and I won't take up on a project, especially an urgent one, without a quote and a "yes".

Then I get a message back, that translates to something like this:

I won't be paying you, but the miniatures will be displayed in a big wargaming store, so I would get a ton of Exposure. In a country half way accross Europe.

I send him a big fat rant, trying to be as polite as I can. I check back later, and I can't find any response. In fact, I can't find any of the previous messages. I look up the nickname I had written down on a piece of paper, there is no such user. I don't know if I'm dreaming or not.

Haha fuck NO. (copyright The Oatmeal, etc etc.)
MEGA PRO TIP FOR EVERYONE LOOKING FOR A COMMISSION: Dear would be commission people (don't know the word, commissioner seems weird in this setting), if you want a miniature painted, it will cost you. It takes paint, brushes, tools, time, and most importantly SKILL. A skill you do not possess. It isn't free. So please, either accept the fact that people charge you money for stuff you can't fucking do, or paint/make/whatever them yourselves.


And I thought clients in my retail job are mega douches.

Rant over.

Till next time,
Banshee Legend
The Painter