Saturday 23 April 2016

Commission 4: Episode 3: Mr Bendy Staff becomes an amputee, and why I hate painting Fantasy Flight miniatures

Ohai!

It's that time of the week again, and today I got around to painting another one of the Commissioned 4. It was time to paint Mr Bendy Staff (heheh). Now, before we start, it's become a custom for me to show you guys the reference picture I was given. Wanna guess?

.

.

.

.

.

.

Well?

.

.

.

.

.


Yup

Derpity!

With a couple of reverse google searches I found a bigger picture and found out his name. Rylan Olliven.

Now, before I start going through the painting process (face painting tips coming!), I would like to vent. Or rant. Whatever.

The game these miniatures belong to, Descent: Journeys in the Dark 2nd Edition is made by Fantasy Flight Games (which we will call FFG from now on so your little blog reading eyes don't get too tired of long names). For those of you who don't know, FFG make a lot of quality board games. Many of them include miniatures, and those miniatures are amazing. Truly. But they are not made to be painted. and I'm not talking about all the excess plastic I need to cut and file before I take to the brush. The poses are crooked. The molds are somewhat silly (like the gap between the front and the back of a robe being filled with plastic) and a little retarded to say the least. The plastic is soft, bendy and (something I learned from the interwebz, thank god) start melting and deforming if a hardware store primer is applied. In short, it's a god damn nightmare to paint them. Parts that are supposed to be different colo(u)rs touch each other, and that wouldn't be an issue if the plastic wasn't that bendy. Why, you ask? Because every time you bend a plastic part to paint around it, it either deforms or breaks. Or both.

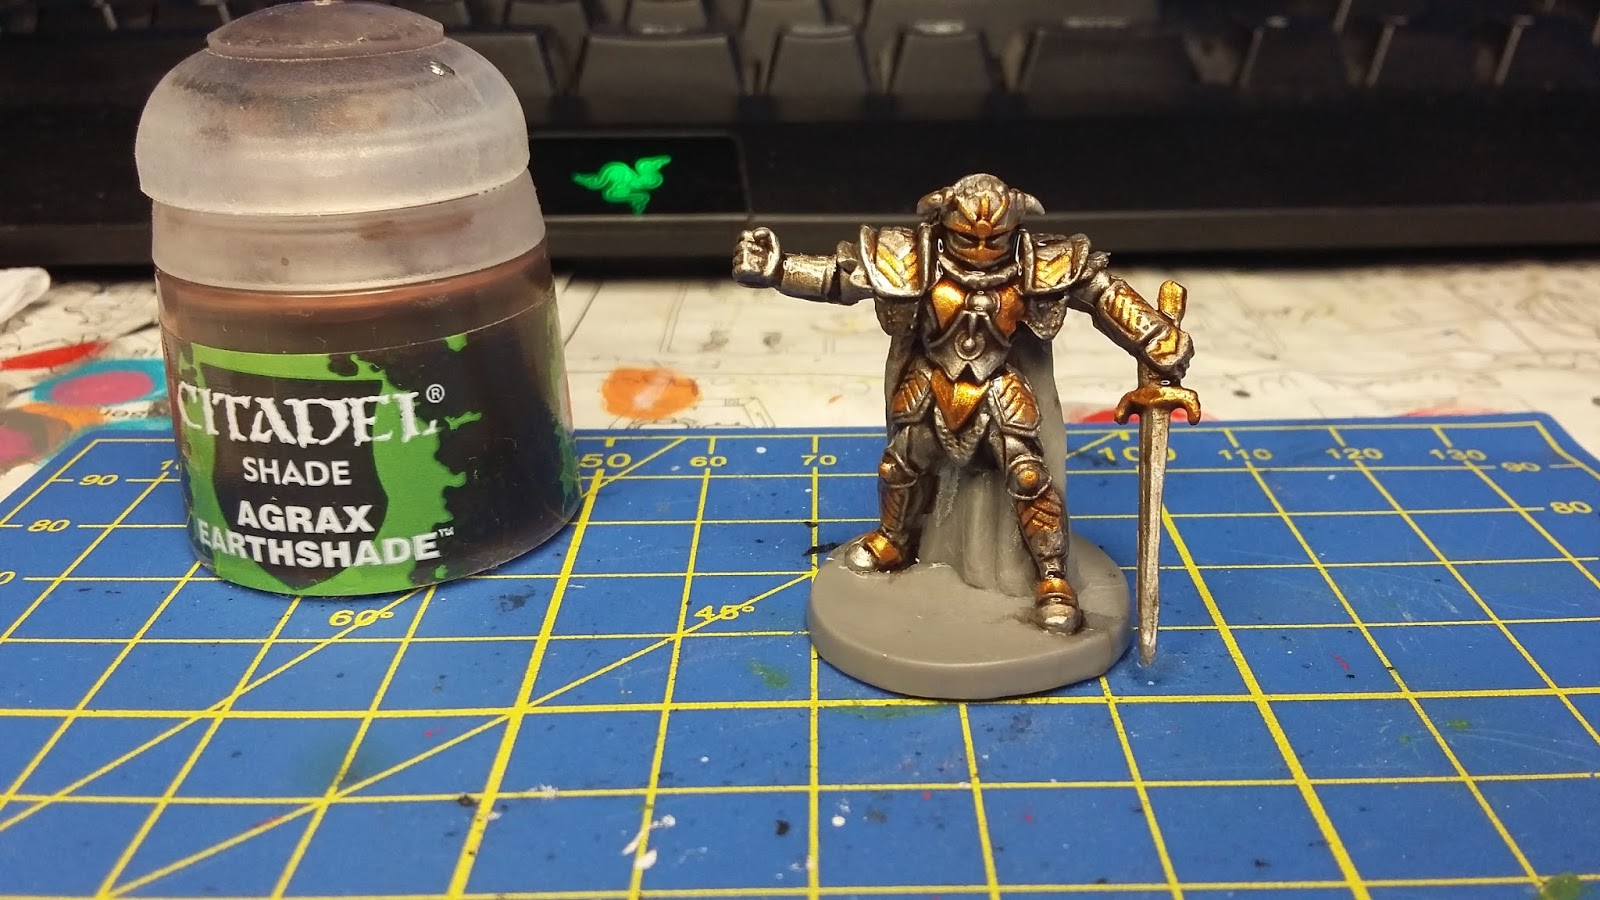
This was the deal with Rylan here. His staff was in a position that required me to bend it around (hence the name) and I almost broke it twice while cleaning the excess plastic and molding lines.


You can see the staff bent in this picture

That means I would have to amputate Rylan's right hand, paint everything, and slap that hand back on him. So that's what I did. Snip Snip!

I'm just glad it was his hand-staff that needed cutting


Okay boiz and girlz! Time to get to painting. If you ever decide to paint a miniature with a face and don't have a lot of experience with it, do this: Paint the whites of the eyes first, then the iriseseseses, then paint the face over. Like this:


Hair, beard and staff painted


With that done, it was time to paint the cape. I even bought a new colo(u)r blue for it! After the first layer of paint it looked a bit fluorescent, which gave me a bit of a shock.

Oh yeah, painted the shoes brown too

Sure glad the second layer fixed that.

As people say, when in doubt, add another layer (they don't say that)! After that was done, his garments were in dire need of some paint! Colo(u)r grey (Administartum Grey from Games Workshop) seemed to do the trick.

Also added eyebrows. No man is complete without eyebrows.

Then it was time to stick the poor guy's arm back. And, of course, wash! This time I used two of them. My beloved brown for his garments and a purple for the blue cape (again, purple is still better than black, since it doesn't have that glossy oily finish). After the washes were dry, I painted some highlights on the back of the cape to make it look three dimensional.

To add to that, my lovely lady helped me decide on a highlight colo(u)r for the cape.


It seemed I was almost done with this, but Raylan still needed some brushing up. I took out my shiny metallic colo(u)rs and painted some details for his garment and staff. Some drybrushing with a lighter shade of brown was done on his boots and gloves as well.


Now that Raylan looked like a man of stature, it was time to finish up with his staff. Since the reference picture showed it as if it was made of stone, a colo(u)r dawnstone was used on the Ram Head and washed over with some brown wash. And here is the final outcome:

Mr. Raylan Bendy Staff

Well, after all this ranting and painting, it's time for me to go to rest. Raylan is now in colo(u)r, my back is hurting and I really need a smoke.

Till next time,
Banshee Legend
The painter

TFCTBY!


Sunday 17 April 2016

Commission 4: Episode 2: The Human I Torched My Extremities lights up. Also, Medieval Thingamajig gets an update

Ohai!

So it was time to paint another person from the Commission 4. And since I found out some backstory about it, I chose to paint the Human I Torched My Extremities, as he is the brother of my first painted mini, the Medieval Thingamajig (fans of the Thingamajig, there's a little surprise for you at the bottom!).

DISCLAIMER: This post is image-heavy.

I started out with him the same way any other mini - choosing colo(u)rs. The reference pictures sent to me were, again, a card face and an already painted miniature in a whopping "xl" size. I'll let you guess the colors of the miniature, besides the fact the dude's head and arms are on fire, which include red, orange and yellow.

.

.

.

.

.

Well?

.

.

.

.

.
NO, he's mostly gray and black.

Card face. BRUTAL-ER!

Again, original size picture

Since I like painting with colo(u)rs that range a bit farther than the beloved book of many single moms around the world, I looked at card face picture, squinted and saw purple. You know what I said to myself?

TIME TO DO THIS!

Again, I start out with the base colo(u)rs - the ones that will dominate on the miniature.


Red and purple, yay!

Moving on, I wash the whole robe with a black wash (remember what I wrote in the last post? DO NOT USE BLACK WASHES. well I didn't listen to myself and had a lot of cleaning up to do afterwards) and add colo(u)r in the chest piece and the scarves (I guess).

Yes, the colo(u)r is different from the stock miniature.

I mean, look at his head. See the difference? Me neither.

And then... The flaming extremities! I have to confess, I haven't painted anything even remotely similar to a fire before. So I took a few colo(u)rs that you can see when looking at flames and went for it (I hope some of you are thinking ooooh, he's a true professional...). So again, step by step:

Red!

Orange!

YELLOW! P.S. It's starting to sound like a Power Rangers episode...

After the colo(u)r yellow and when the flames were looking decent I applied another layer of brown wash, which made the flames look 3d. I also added the wash on the chest piece and the scarves.

I looked at the card face picture again. He had a ton of tiny gold details on his chest piece and on the lower (red) part of his robe. This meant I had to smear my nose print on my lamp's magnifying glass. Maybe one day I'll add a picture of me doing that, but before that time comes, this is the finished gold detailing:

Note the detailing on the bottom (red) part of the robe. DISCLAIMER: these are not my fingers. P.S. someone compliment my lady's miniature holding skills and manicure pls.

Beautiful, isn't it? This seemed like the finishing touch the Human I Torched My Extremities needed. So I cleaned up the glossy robe a bit and sent my work to the order-placer-man.

He said cool.

Okay, cool. Here's the finished (base-less, since I am planning on doing a basing step by step) miniature:

Cue Darth Vader's (™ & © Disney, I guess) NOOOOOOO from episode 3

Still looks like a chick to me... -A friend

This was pretty quick, only took about an hour from start to finish. Now onto the Medieval Thingamajig. I had some tiny shields left over from my earlier miniatures (Games Workshop is good for one thing - they add a lot of option parts that can be re-used for a greater good):

Tiny shields

I sent the order-placer-man this picture, saying that Mr. Medieval Thingamajig still looked unfinished and if it was cool to add a shield to his empty hand. Not only did he say cool, he also sent me a picture of a god damn card in the game, that gives the guy a god damn shield:

Gotta love board games, eh?

He insisted that I make the eyes of the skull red. Now there's a thing you have to understand... the shield is 4x3 god damn MILLIMETERS in size. IT'S GOD DAMN TINY. The whole miniature measures a tad over 22mm. So I took some super glue (the plastic cement does not work after you have already painted the miniature) and stuck that thing on his extended arm. I must admit it seems more like a buckler than a shield, but it does give Medieval Thingamajig the completion he deserves. The question still stands though - can I make the eyes of the skull red?

CAN I MAKE THEM RED?

What do you think?


Fuck YES, I can.

The shield painting was pretty straight forward - Evil Sunz Scarlet (in other words, plain bright red) spots where the eyes are, Ironbreaker base (also known as gunmetal, same one I used for his armor), Brown wash (Agrax Earthshade) and some Mithrill Silver (plain silver in non-Games Workshopian) for the edges, visible bolts and to make the skull ornament literally pop out.


Brutal? Yes. Red less-than-a-millimeter-wide eyes on the shield kind of BRUTAL!

That is all for today.

For episode three I have prepared Mr. Bendy Staff (heheh).

Till then,
Banshee Legend,
The Painter

TFCTBY!

Commission Rant, aka NO FREE SHIT, EVEN ON THE INTERNET.

So I'm at work minding my own business. I open up a local miniature wargaming club's page to see if I received any private messages. I did. One random message from a user registered today. Red flag.

He's asking me to do some commission painting, 30 miniatures, tabletop quality at least. I calculate it to be at least 210 EUR. My monthly pay is 245-ish. Big fat GREEN FLAG.

He tells me he's from Lithuania, just like I am. Green flag.

The miniatures are to be painted in 3 days. Yellow flag.

I tell him it would cost extra. No reply.

The triange of Truth


A few minutes later I get a new thread of  Private Message saying he would take these miniatures to a store in the United Kingdom, where they would be set up on a display, visible to everyone.

I say it's cool, but he hasn't aggreed on a price, and I won't take up on a project, especially an urgent one, without a quote and a "yes".

Then I get a message back, that translates to something like this:

I won't be paying you, but the miniatures will be displayed in a big wargaming store, so I would get a ton of Exposure. In a country half way accross Europe.

I send him a big fat rant, trying to be as polite as I can. I check back later, and I can't find any response. In fact, I can't find any of the previous messages. I look up the nickname I had written down on a piece of paper, there is no such user. I don't know if I'm dreaming or not.

Haha fuck NO. (copyright The Oatmeal, etc etc.)
MEGA PRO TIP FOR EVERYONE LOOKING FOR A COMMISSION: Dear would be commission people (don't know the word, commissioner seems weird in this setting), if you want a miniature painted, it will cost you. It takes paint, brushes, tools, time, and most importantly SKILL. A skill you do not possess. It isn't free. So please, either accept the fact that people charge you money for stuff you can't fucking do, or paint/make/whatever them yourselves.


And I thought clients in my retail job are mega douches.

Rant over.

Till next time,
Banshee Legend
The Painter

Tuesday 12 April 2016

Commission 4, Episode 1: The Story of Medieval Thingamajig

It was time.

I took out my brushes, my hobby knife and cutting board, paints and a new batch of paint water. I looked at the guy I came to call the Medieval Thingamajig. And I was lost. I had no idea how to make him look good without moving out of the paint scheme I was commissioned to do. I don't have anything against paint schemes per sé, but the guys in Descent: Journeys in the Dark (2nd edition) all seem to have the same thing in common - they are all a different hue of gray, gold or the mix of the two. Or at least the ones I've seen so far.

I was given two pictures as a reference:

BRUTAL

The first picture looked like something you would find on a character card in most dungeon crawler games. It wasn't much, but I could work with that. The second picture though. THAT one blew me away:

Second picture, ORIGINAL SIZE.

Now, if you know anything about painting commissioned miniatures, you know that good reference pictures are always cool to have. but trying to look at this tiny pic (the URL even says ..._expansion_pack_xl.jpg) made my eyes hurt all over. Trying to ignore it, I got to work.

If you don't know anything about painting commissioned miniatures and want someone to paint one for you "like that one on the internet", PLEASE find them good reference pictures. 360 degrees is the way to go.

Now jokes aside (two high-res pictures of a miniature paint scheme is more than enough), I liked how this guy looked. And since I was lacking reference pics, I asked my customer for some backstory on THE DUDE IN THE ARMOR (that's a partial quote of my question). The answer, and I quote, word for word, was this:

Dude was a good dude. Fought some bad guys and died. Got ressed (ressurrected) by brother (the guy with flames, aka The Human I Torched my Extremities), who was turned evil by the vampire chick

*sigh* Time to go to work! 

Having all the extra information about Alric Farrow (I'm still calling him the Medieval Thingamajig), I started making him look the part. Step one was a base coat of a lighter metallic shade:


The most literate meaning of METAL

Now some of you (mostly the guys and girls who paint miniatures from time to time) are asking yourselves - why a lighter shade of metallic? Simple - after a couple of coats of wash, the lighter shade becomes darker, but still keeps the shine in some places.


For the not so literate in miniature painting - a wash is a special watered-down paint that flows into the cracks, creases and crevices of the figure.

Obviously, before starting with a wash, I had to paint the darker "chain mail" spots with a darker metal shade and add the gold coloring as well. Since I am a bit special today, I didn't take any pictures of the miniature sans wash, so here you go, gold color added and wash applied:

The wash gives the miniature a bit more depth. To see the difference, look at the differences between the breastplate in the earlier picture.


Pro tip for beginners: to achieve the worn down, dirty look, use a brown wash instead of a black one. Black washes tend to leave glossy marks on metallic paint, which make it look oily.

Now that I was semi finished with the armor, it was time to make the cloak pop. I achieved this by using three different shades of red and the same brown wash, seen in the pictures above:

First coat is a base paint, Citadel Khorne Red
I then painted the wrinkle edges with a ultra bright Evil Sunz Scarlet and painted over that with a darker tint Red Gore, which makes the edges look just a little bit lighter

With this done Alric was starting to look alive (alive-er?). With a few highlights on the edges of the metal shoulderpads, gauntlets (seen above) and breastplate (seen below) it was time to finish.

Breastplate, greaves, gauntlets and kneepads highlited with the initial base color, Mithrill Silver

But then I looked closer at this great Medieval Thingamajig. He looked... Generic. Now, I like to see myself as an artist, and artists always leave something to their imagination. This is when it hit me - his armor was in dire need of a little non metallic, non red detail. Enter the breast gem:

Breast gem was painted using two colors, Sotek Green for base and Temple Guard Blue for highlight. Note - my fingers are not THAT huge.

And then I was hit by another idea, that was minute, but made perfect sense. In the snippet of lore I got, Alric was ressurrected. HE WAS DEAD, GOD DAMN IT. I don't know how long he was dead for, but since his armor was looking all worn out and rusty, why should his sword look any different?

With a technique called stifling (taking an old, preferably almost destroyed brush and dabbing the color on the part to look like it's random spots of rust/dirt/whatever) I made his weapon look the part as well.

Pro tip for beginners: do NOT use your favourite brush for this.

And there he is, Alric The Medieval Thingamajig Farrow was all painted and fancy.
Red horns'n'all

All that's left is the base, but I shall leave it for the next post.

Till then,
Banshee Legend
The Painter

TFCTBY!

Saturday 9 April 2016

Commission Update: Commission 4 comes into play, Joan stays on the bench.

So today I met with the guy who commissioned some of his miniatures to be painted (some of them you can see in my first blog post. All the miniatures are from a dungeon crawler game called Descent: Journeys in the Dark 2nd Edition.

So here's the situation. A few days ago we texted a bit to talk about where and when we will meet up for the transaction (he lives ~100km/60mi away), and he told me that he will not be commissioning any more miniatures for the time being, as he doesn't have extra funds or something like that.

Today, after we met and finished the transaction, I was getting ready to leave, closing my little miniature case (actually a box for a holographic sight). He stopped me, and procured another 4 28-32mm scale miniatures from the game.

 This meant two things:

1) Joan of Arc by Corvus Belli had to be benched indefinitely.
2) MOAR CASH FOR MINIATURES

I was cool with both of those, so I took these 4 guys back home with me. After closer inspection these guys reminded me of the Fantastic 4 a bit, besides the fact that two were male and two were female (although Johnny Storm aka the Human Torch could pass as a chick imo), so I decided to call them the Commission 4:


Left to right: Mr. Bendy Staff (heheh), the Medieval Thingamajig, the Cone of Shame (Wish I was Invisible) Woman and the Human I Torched my Extremities.

Commissioned 4, the backsides (sounds like a sequel, doesn't it?)
As today is Saturday, I seem to have some fun stuff planned (already went to a museum with the Mrs.), so I will start these guys out tomorrow.

Till then,
Banshee Legend
The Painter


TFCTBY!*


* THANKS FOR CLICKING THE BLOG, YO!